
- Published on
Data Modeling at Tincre Part II
- Authors
- Name
- Jason R. Stevens, CFA
- linkedin@thinkjrs


This is the second of two articles covering how we rock application data modeling at Tincre.
Putting it together
So let's do a quick review before we tie all this together. At Tincre we:
- model our PostgreSQL tables using Prisma on the TypeScript/JavaScript side,
- read and write those models with SQLAlchemy on the Python side,
- manipulate application-specific data and logic via Pydantic models on the Python side.
A small app
So let's build a tiny application to show off how this all works together. We'll run the thing locally, so don't expect this to deploy right out of the gate. That's out of scope for our purposes here.
Below are a few high-level items you'll need to get started.
- A linux environment (no, this probably won't work out of the box on Windows or Mac),
- a PostgreSQL database (see the brief instructions below),
- modern Node.js (16+) installed, and
- modern Python (3.8+) installed.
We will not review how to install these, here, other than PostgreSQL. We also assume you use git and have a Github account.
Also note that we'll call the app altogether data-modeling-at-tincre-part-2, created by create-next-app, below.
You should name this whatever you'd like, such as
shit-sandwich-app!
Next.js + TypeScript
Assuming you use npm or yarn, install Next.js with the --typescript flag.
npx create-next-app@latest --typescript data-modeling-at-tincre-part-2 # yarn create next-app --typescript
Now you have a wicked-fast frontend out of the box that we'll use to interface with your Python backend. If you want to get extra-fancy, proxy requests to Python using Next.js's built-in api routes (which we often do)!
Now move into that project directory.
cd data-modeling-at-tincre-part-2
Setup Prisma
Install Prisma dependencies into your Next.js project.
npm install prisma --save-dev # yarn add prisma --dev
Now initialize Prisma.
npx prisma init
You should update the created .env file's DATABASE_URL variable with your PostgreSQL URI string.
For example, DATABASE_URL="postgresql://<your-user-name>:password@127.0.0.1:5432/postgres" if you followed our local database setup instructions.
Add the simple Payments model
You should now have a primsa/schema.prisma database model which was created for you by the prisma init command above.
Edit this file and add the following model from the first piece in this series:
model Payment {
  id            Int      @id @default(autoincrement())
  paymentSentAt DateTime @default(now()) @db.Timestamptz(6)
  myParam       String?
}
To commit changes to the database, run:
prisma migrate dev
Your live production build of the Next.js app will run proper Prisma migrate on its own, once we detail that in the third part of this series.
FastAPI
Now within your Next.js application create yourself a new directory to house your FastAPI Python backend.
Create the app directory
For example, create a directory called backend-example:
mkdir python-backend
cd python-backend
Create and install a Python environment
Let's create a Pipenv file, since that's what we like to use at Tincre for most projects.
ℹ️ If your shell complains that
pipenvis not installed, install it --pip install pipenv --user.
Using the content below, create the following file with your favorite editor. We'll use vim.
vim Pipfile
# -----------------------------------------------------------------------------
# The default Tincre Pipfile.
#
# This should be customized per application requirements; uncomment or add
# those packages required. This should be used for data science, web, and
# most other Python-based projects, replacing raw venv or anaconda usage.
# -----------------------------------------------------------------------------

[[source]]
url = "https://pypi.org/simple"
verify_ssl = true
name = "pypi"


[dev-packages]
# you don't need these but useful
ipython = "*"
black = "*"
pytest = "*"
pytest-cov = "*"
pre-commit = "*"
# the below will change once maintainer can get to https://github.com/agronholm/sqlacodegen/issues/239
sqlacodegen = {git = "https://github.com/agronholm/sqlacodegen.git"}

[packages]
# you do need these
fastapi = "*"
uvicorn = "*"
toml = "*"
gunicorn = "*" # you don't need this if you're not deploying
psycopg2 = "*"
sqlalchemy = "*"

[requires]
 # you should probably pin an exact version and use the most recent version available
python_version = "3.11"
Then run pipenv install --dev to install all packages.
If you'd like to generate a standard
requirements.txtfile, runpipenv requirements --hash.
Create main.py
To do that jump into the environment shell with pipenv shell by running that in your terminal.
Create a file called main.py and add the content below to it.
# https://fastapi.tiangolo.com/tutorial/first-steps/
from fastapi import FastAPI

app = FastAPI()

@app.get("/")
async def root_route():
    return {"message": "Hello, world!"}
Run the app with the shell command uvicorn main:app --reload; this will fire up a server running your FastAPI application on port 8000.
Create database.py
You now need to create a module to house database internals, which you'll use elsewhere.
vim database.py and fill it with the following code.
from sqlalchemy import create_engine
from sqlalchemy.ext.declarative import declarative_base
from sqlalchemy.orm import sessionmaker
import os

SQLALCHEMY_DATABASE_URL = os.environ.get("DATABASE_URL") #"postgresql://<pguser>:<password>@<host>:<port>/<pg-database-name>"
if not SQLALCHEMY_DATABASE_URL:
    raise ValueError(f"SQLALCHEMY_DATABASE_URL is not set.")

engine = create_engine(
    SQLALCHEMY_DATABASE_URL,
    # echo=True, uncomment to see lots of logs for sqlalchemy
)
SessionLocal = sessionmaker(autocommit=False, autoflush=False, bind=engine)
Base = declarative_base()
Create an environment file for Python
First run touch .env in your terminal. Then add the following to it and save.
export DATABASE_URL=postgresql://<your-user-name>:password@127.0.0.1:5432/postgres
Now source this environment file into your current shell (which is a Python environment managed by Pipenv) via source .env.
All that last command does is add what's exported in
.envto your shell.
Generate + modify models.py
Now you can use some sqlalcodegen magic to generate your models/tables you created with Prisma earlier.
You can run sqlacodegen $DATABASE_URL --outfile models.py.
Remove the following two lines in your newly generated models.py.
from sqlalchemy.ext.declarative import declarative_base

Base = declarative_base()
Now add the following to your imports.
from database import Base
And you're done with the simple backend!
You can run this locally with the above mentioned command uvicorn main:app --reload. We'll add a Dockerfile and get all this deployed in part three of this series.
PostgreSQL database
The world has many ways to get yourself a PostgreSQL database. Herein we'll detail two, supabase.com and locally, on your machine.
Supabase instructions
In many ways, the web and the last decade's rapid enhancement of foundational engineering beneath it have enabled a much simpler, robust, and easier paradigm to get up and running quickly with databases.
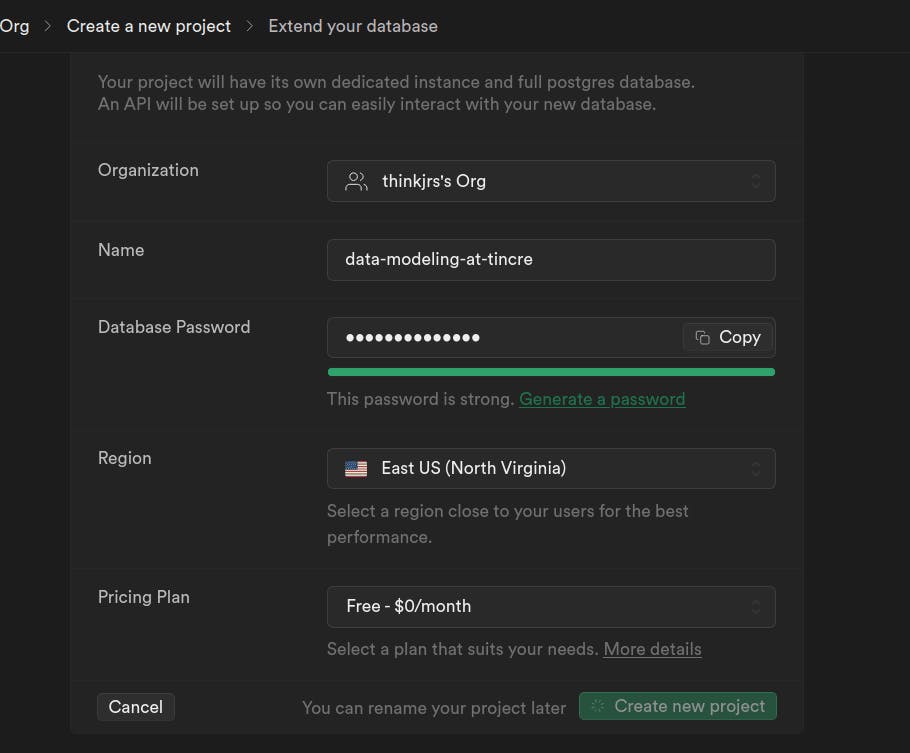
One of those is Supabase. To get going quickly follow that link then sign up and start a free-tier project.
It should look something similar to the shot below.

Now inside your project navigate to the project settings. Then find the database tab and copy your connection string, like below.

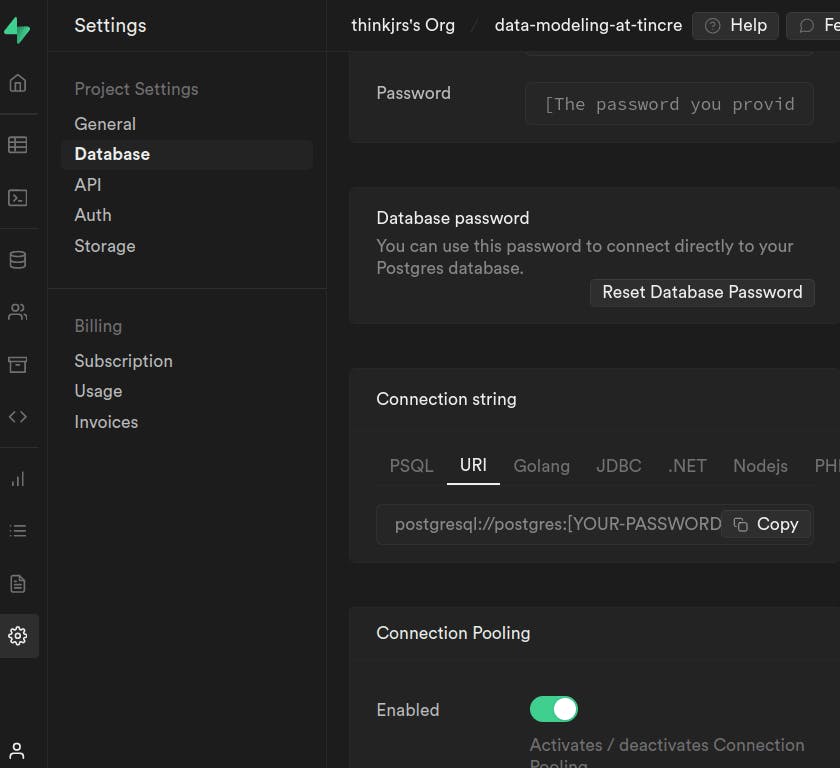
Copy that connection string and add your password as you're done with this step. You should skip the local installation instructions, below.
Local instructions
We'll use Prisma.io's guide to get PostgreSQL installed locally for testing. Specifically, we will utilize the instructions to install from default repositories on Ubuntu.
Update your package cache:
sudo apt update.Install the
postgresqlpackage:sudo apt install postgresqlThe installation process created an operating system user called
postgresto match thepostgresdatabase administrative account. To log into PostgreSQL with thepsqlclient, usesudoto run the command as thepostgresuser. - Prisma.io documentation linked to above.Log into the
postgresuser:sudo -u postgres psql(type\quit) when finished.Type
/conninfoto get your username and database name (postgresandpostgres).Now get the local server and port address via
sudo netstat -plunt | grep postgres # replace grep with rg if you have ripgrep, it's better.
Note: there is not typically a default password set, so you'll need to do this if you plan to store any sensitive user or application data there. 5. Complete the following URI scheme using the information from 4:
- Create a database user named your Unix/Linux user. For example, mine is
jasonand the password here ispassword.
CREATE ROLE jason WITH LOGIN PASSWORD 'password';
ALTER ROLE jason CREATEDB;
postgresql://<pguser>:<password>@<host>:<port>/<pg-database-name>
It should probably look exactly like the following snippet, if you also named your user jason.
postgresql://jason:password:localhost:5432/postgres
You'll use this in an environment variable in order to connect to the database via Prisma and SQLAlchemy.
🧐 Stay classy and go get a coffee. Part three will explore some different ways to deploy what you've built!